How To Add Custom Fields To Custom Taxonomies
In this tutorial, I'm going to show you how to add an additional custom field to your WordPress custom taxonomies and then make use of those fields within your theme template.
Adding A Custom Field To A Custom Taxonomy
In the code that follows, we'll create a callback function (what is a callback function?) that will add a custom field to the custom taxonomy we created (in this case, "presenters") and then we'll create another callback function to save changes made to that field. Last, we'll associate our new callback functions with the custom taxonomy we created.
To add a custom field to your custom taxonomy, add the following code to your theme's functions.php:
// A callback function to add a custom field to our "presenters" taxonomy
function presenters_taxonomy_custom_fields($tag) {
   // Check for existing taxonomy meta for the term you're editing
    $t_id = $tag->term_id; // Get the ID of the term you're editing
    $term_meta = get_option( "taxonomy_term_$t_id" ); // Do the check
?>

<tr class="form-field">
    <th scope="row" valign="top">
        <label for="presenter_id"><?php _e('WordPress User ID'); ?></label>
    </th>
    <td>
        <input type="text" name="term_meta[presenter_id]" id="term_meta[presenter_id]" size="25" style="width:60%;" value="<?php echo $term_meta['presenter_id'] ? $term_meta['presenter_id'] : ''; ?>"><br />
        <span class="description"><?php _e('The Presenter\'s WordPress User ID'); ?></span>
    </td>
</tr>

<?php
}
In the code above, we created a "callback function" called "presenters_taxonomy_custom_fields" that we will apply, using a WordPress action hook, to the "edit" screen of our custom taxonomy terms. In our case, we are creating a custom field to store the "User ID". To use this to store different information, replace each instance of:
presenter_idWith your own unique custom field name. For example:
custom_field_nameNote: As a best practice, I recommend naming your custom fields using all lowercase letters and underscores to separate multiple words.
To add an additional field to your custom taxonomy term interface, copy everything from <tr> to </tr>, duplicate it above or below, then give the fields their own unique name.
Note: If you want to create custom fields for multiple taxonomies, duplicate the code above and use a unique name for the callback function. For example, "presenters_taxonomy_custom_fields" would then become "yourname_taxonomy_custom_fields". If you intend to use the same custom fields on multiple taxonomies, I suggest a more general name.
Next, we'll create a callback function that we'll use to save our custom fields. Add the following code to your theme's functions.php:
// A callback function to save our extra taxonomy field(s)
function save_taxonomy_custom_fields( $term_id ) {
    if ( isset( $_POST['term_meta'] ) ) {
        $t_id = $term_id;
        $term_meta = get_option( "taxonomy_term_$t_id" );
        $cat_keys = array_keys( $_POST['term_meta'] );
            foreach ( $cat_keys as $key ){
            if ( isset( $_POST['term_meta'][$key] ) ){
                $term_meta[$key] = $_POST['term_meta'][$key];
            }
        }
        //save the option array
        update_option( "taxonomy_term_$t_id", $term_meta );
    }
}
The code above will work "as is" for one or more custom taxonomies, no changes needed. Alright, now let's associate these callback functions to the "edit" screen for our custom taxonomies. To do that, we'll use two of the WordPress action hooks that are available for each custom taxonomy that we create. Add the following code to your theme's functions.php:
// Add the fields to the "presenters" taxonomy, using our callback function
add_action( 'presenters_edit_form_fields', 'presenters_taxonomy_custom_fields', 10, 2 );

// Save the changes made on the "presenters" taxonomy, using our callback function
add_action( 'edited_presenters', 'save_taxonomy_custom_fields', 10, 2 );
With the code above applied, editing a term should give you a screen that looks something like this:
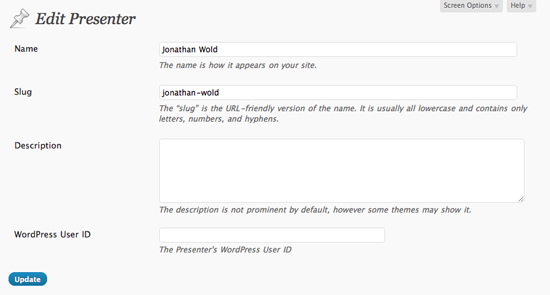
- A custom field of "User ID" has been added to the editing screen for each of the terms in my "Presenters" custom taxonomy.
And there you have it. The first action tells WordPress to "add" our custom fields to the "edit" screen of our "presenters" custom taxonomy. The second action tells WordPress to "save" our custom taxonomy fields when you save the changes to your "presenters" custom taxonomy. To use this for your own custom taxonomies, simply replace "presenters" with the name of your custom taxonomy. For example, "edited_presenters" would be "edited_your-taxonomy". To use the code above for more than one custom taxonomy, duplicate both lines as needed, replacing "presenters" with the respective name of your custom taxonomy.
Note: This particular method uses the "options" table in WordPress to store data for each particular term. As of WordPress 3.1, terms don't have their own "meta" table and, accordingly, this lets us get past that. There will probably be a cleaner way to do this in future version of WordPress - until then, this will do the job well. Thanks to Ohad Raz and his post on extra fields for custom taxonomies for pointing me in the right direction.
Associating "Presenters" With WordPress User Accounts
Now, let's put our custom field to use. In our example, let's say that some of our presenters will actually have user accounts in WordPress which they may (or may not) use to publish new content themselves. Along with their user account, they have a profile that contains their name, website, social media accounts, and data associated with any other fields you add.
Note: To add custom fields to your user profile, take a look at this post by Justin Tadlock, Adding and using custom user profile fields, or Mike Schinkel's answer to this question on WordPress Stack Exchange.
In the following example, we're going to use the WordPress User ID field we added to our "presenters" custom taxonomy to check that ID against the list of WordPress users and give us access to the corresponding user's profile data.
To access a custom field added to your custom taxonomy using the method noted earlier, add the following code inside your custom taxonomy template (in our case, taxonomy-presenters.php), within the PHP block at the top:
// Get the custom fields based on the $presenter term ID
$presenter_custom_fields = get_option( "taxonomy_term_$presenter->term_id" );

// Return the value for the "presenter_id" custom field
$presenter_data = get_userdata( $presenter_custom_fields[presenter_id] ); // Get their data
Alright, let's start with the first variable, $presenter_custom_fields. In our earlier example, we created a new entry in the WordPress options table, named after the term ID of a given term. So, if the ID of a particular term was 27, the name of the field that stores its data would be "taxonomy_term_27". In our example, we created a custom field called "presenter_id".
Note: For this example to work, be sure that you have saved a value in the custom field for the term you are working with. In my example, I've added the "presenter_id" of "1" (the ID for my user account) to the "Jonathan Wold" term in my "presenters" custom taxonomy.
To see what data is stored inside the custom fields you created, add the print_r function to your template, then preview it:
<?php
    echo '<pre>';
    print_r( $presenter_custom_fields );
    echo '</pre>';
?>
In our example, the only custom field we have is "presenter_id", and the value that is returned is "1". Now, I have the ID I need to access the user profile, which we do with the second variable:
$presenter_data = get_userdata( $presenter_custom_fields[presenter_id] ); // Get their dataSo, we define our variable for use later as $presenter_data. Then, we use the get_userdata function, which, as expected, requires the ID of the desired user profile. We could pass in an actual ID, like this:
$presenter_data = get_userdata("1"); // Get their dataTo keep it dynamic, we are passing in the "presenter_id" field of our $presenter_custom_fields variable. Now, to see what data you have to work with, use print_r again:
<?php
    echo '<pre>';
    print_r( $presenter_data );
    echo '</pre>';
?>
Then, you can access the data based on the "key" name. To get the first name, for instance:
<?php echo $presenter_data->first_name; ?>To get the description (or "Biography" field), use:
<?php echo $presenter_data->user_description; ?>Tip: Referencing Images or Filenames By First/Last Name
One particularly useful technique I've found is predicting a file structure for cases like profile images or press kits, etc., where I've wanted to let the client upload assets directly to the server, rather than build an interface to manage uploading.
First, we need to have a lowercase, dash separated version of the display name. To get that, add the following code to the PHP section at the top of your template:
$presenter_formatted_name = strtolower( str_replace( " ", "-", $presenter_data->display_name ) ); This fancy-looking piece of code declares the $presenter_formatted_name variable and, in English, tells PHP to take the "display_name" value from our $presenter_data variable, replace spaces with dashes, and convert the resulting string to lowercase. In the case of a display name of "Jonathan Wold", the variable would return "jonathan-wold". In the case of a single name, like "Admin", the variable would return "admin". Now, in our template, we can use that consistent name as we'd like.
For instance, in a profile image, we might use the following:
<img src="<?php bloginfo("stylesheet_directory"); ?>/images/<?php echo $presenter_formatted_name ?>.jpg" />That tells WordPress to check the "images" folder in the directory that holds your theme's stylesheet and look for an image, in my case, named "jonathan-wold.jpg". Let's say we stored a folder called "assets" in our root directory, outside of WordPress. We would use the following:
<a href="/assets/press-kits/<?php echo $presenter_formatted_name ?>.zip">Download Press Kit</a>Conclusion
And that's it! This set of functions allows you to add any types of fields that you can imagine and then make use of them in a limitless number of creative ways. Let me know what you come up with!